
'%3e%3cg%20id='编组-7'%20transform='translate(370,%20220)'%3e%3cg%20id='编组-6'%3e%3crect%20id='矩形备份-17'%20x='0'%20y='0'%20width='20'%20height='20'%20rx='8'%3e%3c/rect%3e%3c/g%3e%3cg%20id='infinity'%20transform='translate(0,%205)'%20fill='%230A2239'%20fill-rule='nonzero'%20stroke='%23FFFFFF'%20stroke-width='0.4'%3e%3cpath%20d='M15.4545455,0%20C13.7892264,0.0696012991%2012.2210667,0.802936905%2011.1,2.03636364%20C11.3636364,2.32727273%2011.6272728,2.60909092%2011.8818182,2.90000001%20C12.1363636,3.19090909%2012.1727273,3.21818182%2012.3181818,3.38181821%20C13.1187994,2.47034367%2014.2447814,1.90898453%2015.4545455,1.81818182%20C16.9607766,1.81818182%2018.1818182,3.03922343%2018.1818182,4.54545457%20C18.1818182,6.05168572%2016.9607766,7.27272732%2015.4545455,7.27272732%20C13.8181818,7.27272732%2012.5181818,6.01818186%2011.2090909,4.54545457%20L10.6818182,3.94545457%20L10,3.17272728%20C8.5,1.50909091%206.87272726,0%204.5454545,0%20C2.03506929,0%200,2.03506936%200,4.54545457%20C0,7.05583979%202.03506929,9.09090914%204.5454545,9.09090914%20C6.87272726,9.09090914%208.5,7.58181822%2010,5.91818186%20C11.5,7.58181824%2013.1272727,9.09090914%2015.4545455,9.09090914%20C17.9649307,9.09090914%2020,7.05583979%2020,4.54545457%20C20,2.03506936%2017.9649307,0%2015.4545455,0%20Z%20M4.5454545,7.27272732%20C3.03922336,7.27272732%201.81818176,6.05168572%201.81818176,4.54545457%20C1.81818176,3.03922343%203.03922336,1.81818182%204.5454545,1.81818182%20C6.18181815,1.81818182%207.48181816,3.07272729%208.79090907,4.54545457%20C7.48181816,6.01818186%206.18181815,7.27272732%204.5454545,7.27272732%20Z'%20id='形状'%3e%3c/path%3e%3c/g%3e%3c/g%3e%3c/g%3e%3c/g%3e%3c/svg%3e)
'%3e%3cg%20id='编组-7'%20transform='translate(778,%20140)'%3e%3cg%20id='编组-6'%3e%3crect%20id='矩形备份-17'%20x='0'%20y='0'%20width='20'%20height='20'%20rx='8'%3e%3c/rect%3e%3c/g%3e%3cg%20id='编组-5'%20transform='translate(1,%201)'%3e%3cmask%20id='mask-2'%20fill='white'%3e%3cuse%20xlink:href='%23path-1'%3e%3c/use%3e%3c/mask%3e%3cg%20id='Clip-2'%3e%3c/g%3e%3cpath%20d='M17.9509225,7.46026649%20C17.8511038,7.21913891%2017.6157738,7.06189933%2017.3548337,7.06200015%20L10.9317556,7.06200015%20L10.9317556,0.64509764%20C10.9317556,0.384182775%2010.77439,0.148852742%2010.533464,0.0491097107%20C10.2923112,-0.0507341476%2010.0148608,0.00449379823%209.8303223,0.18903227%20L0.189050477,9.83010244%20C0.00453721144,10.0146157%20-0.0507159412,10.2920914%200.0490270902,10.5332442%20C0.148870949,10.7743718%200.384200982,10.9315105%200.645141053,10.9315105%20L7.07953704,10.9315105%20L7.07953704,17.3368936%20C7.07953704,17.6931151%207.36833055,17.9821102%207.72457726,17.9821102%20C7.89255491,17.9821102%208.05758338,17.9166483%208.18097032,17.7931606%20L17.8107227,8.16340823%20C17.9954376,7.97899579%2018.0507664,7.70141928%2017.9509225,7.46026649%20Z%20M8.37012162,15.7790924%20L8.37012162,10.2863947%20C8.37012162,9.93014795%208.08112646,9.64115279%207.72477892,9.64115279%20L2.20311863,9.64115279%20L9.64117099,2.20310043%20L9.64117099,7.70721683%20C9.64117099,8.06356437%209.93006533,8.35255953%2010.2864129,8.35255953%20L15.796831,8.35255953%20L8.37012162,15.7790924%20Z'%20id='Fill-1'%20stroke='%23FFFFFF'%20stroke-width='0.2'%20fill='%230A2239'%20mask='url(%23mask-2)'%3e%3c/path%3e%3cpath%20d='M5.11999421,14.4299367%20C5.47631655,14.4299367%205.76531171,14.1410423%205.76531171,13.7846948%20C5.76531171,13.4283725%205.47631655,13.1393773%205.11999421,13.1393773%20L2.55036972,13.1393773%20C2.19402218,13.1393773%201.90505222,13.4283725%201.90505222,13.7846948%20C1.90505222,14.1410423%202.19402218,14.4299367%202.55036972,14.4299367%20L5.11999421,14.4299367%20Z%20M5.12306626,16.0846232%20L2.54154419,16.0846232%20C2.18519665,16.0846232%201.89622669,16.3735175%201.89622669,16.7298651%20C1.89622669,17.0861874%202.18519665,17.3751826%202.54154419,17.3751826%20L5.12306626,17.3751826%20C5.4794138,17.3751826%205.76840897,17.0861874%205.76840897,16.7298651%20C5.76840897,16.3735175%205.4794138,16.0846232%205.12306626,16.0846232%20Z'%20id='Fill-3'%20stroke='%23FFFFFF'%20stroke-width='0.1'%20fill='%230A2239'%20mask='url(%23mask-2)'%3e%3c/path%3e%3c/g%3e%3c/g%3e%3c/g%3e%3c/g%3e%3c/svg%3e)


Help Center User GuideResidential Proxies
User GuideResidential ProxiesProxy Cache Certificate Tutorial
391 days ago · Updated
1. Windows settings cache certificate
1.1. Summary
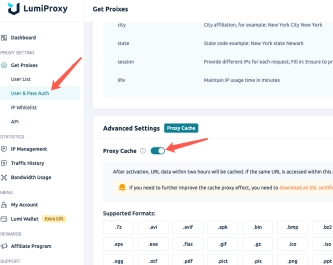
Turn on proxy cache to cache URL data for two hours. If you access the same URL during this period, the content will be provided from the cache proxy, and updates to the target URL will be automatically synchronized.
1.2. Operation steps
1.2.1. Visit the official website (https://www.lumiproxy.com/lumiproxy.crt/) to download the proxy certificate.
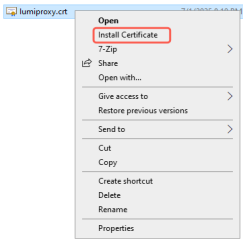
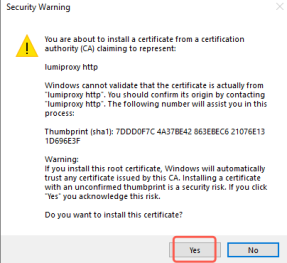
1.2.2. After downloading the certificate, right-click the certificate file and select "Install Certificate".
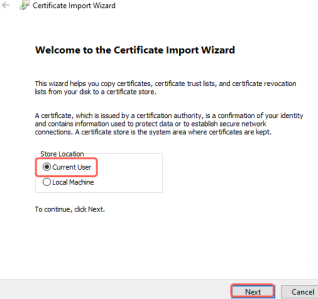
1.2.3. In the Certificate Import Wizard, select "Current User" and click "Next".
1.2.4. Select "Place all certificates in the following store", select the certificate store and click OK.

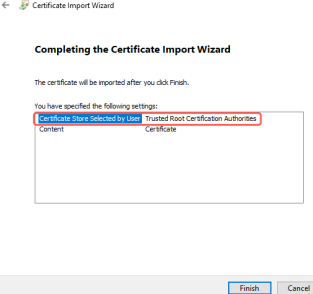
1.2.5. The Certificate Import Wizard is completing, click Finish.
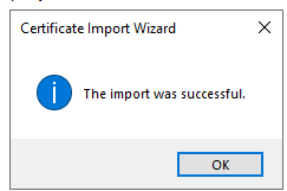
1.2.6. After completion, it will show "Import successful", which means the certificate has been imported successfully.
2、Linux setting cache certificate
2.1. Summary
Turn on proxy caching, and the URL data will be cached for two hours. If the same URL is accessed during this period, the content will be provided from the cache proxy, and updates to the target URL will be automatically synchronized.
2.2. Operation steps
2.2.1. Visit the official website (https://www.lumiproxy.com/lumiproxy.crt/) to download the proxy certificate.
2.2.2. Execute the following command to move the certificate to the target path and update the system trust certificate:

3. MacOS sets cache certificate
3.1. Summary
Turn on proxy caching, and the URL data will be cached for two hours. If you access the same URL during this period, the content will be provided from the cache proxy, and updates to the target URL will be automatically synchronized.
3.2.Operation steps
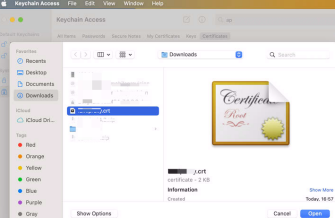
2.2.1. Visit the official website (https://www.lumiproxy.com/lumiproxy.crt/) to download the proxy certificate.
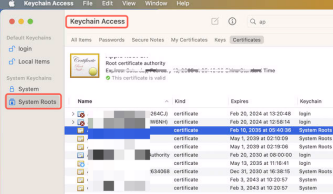
3.2.2. Open Keychain Access, select Keychain: System in the upper left corner, and select Certificates in the category.
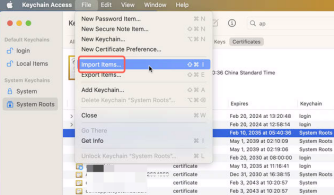
3.2.3. Drag the locally stored certificate into the keychain or click File in the upper left corner > Import Project > Select Certificate File > Open.
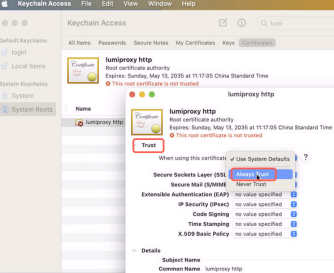
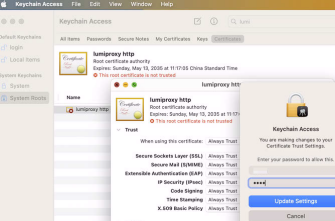
3.2.4. Find the imported certificate, double-click it, open a new window and select Trust Certificate. In the "When using this certificate" drop-down menu, select Always Trust. Close the window and the system will prompt you to enter the administrator password to confirm the change.
3.2.5. When you open Safari or Chrome and visit a website that uses the certificate (such as a self-signed certificate for a local HTTPS service), the message "Connection is not secure" or "Certificate is invalid" will no longer appear, indicating that the certificate is in effect.

Need any help? Email: support@lumiproxy.com


